
I recently completed an integration of IBM Tivoli Netcool Impact 6.1 and Netcool/OMNIbus with ServiceNow. This blog will outline the process and methods that can be used to integrate the manager of managers (OMNIbus) with a service desk solution such as ServiceNow. The customer requirement was for any event that met a specific set of criteria would be raised as an incident in ServiceNow.
ServiceNow has a wide selection of third party integration’s (plugins) provided out of the box, and luckily one of these was the IBM Tivoli Netcool/OMNIbus integration. This plugin allows ServiceNow to send and receive data to a Netcool/OMNIbus ObjectServer. The architecture of the Netcool plugin is outlined in the diagram below:-
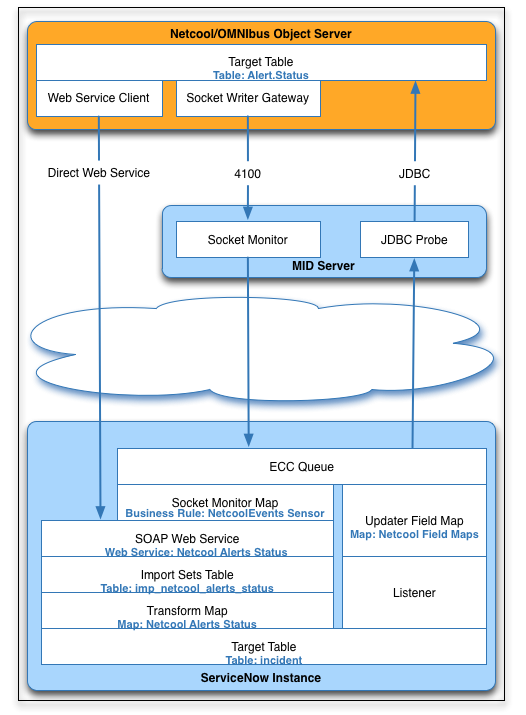
When the Netcool plugin is setup I had to decide how ServiceNow would receive the events. There were two options available to me:-
- The first option was to configure a socket monitor to listen for events from a IBM Tivoli Netcool\OMNIbus Socket Writer Gateway and automatically send them to the External Communication Channel ( ECC) queue
- The second option was to configure a SOAP insert web service that automatically sends events directly to the Netcool Alerts Status web service
The first option was not used because it would have required that the customer purchase an additional license for the IBM Tivoli Netcool\OMNIbus Socket Writer Gateway. However, the customer had recently completed the installation of IBM Tivoli Business Service Manager (TBSM) 6.1, TBSM contains Impact 6.1 as a component and this meant that I could leverage the web services functionality provided by Impact to integrate Netcool with ServiceNow. Please note that there are licensing requirements around the use of IBM’s TBSM and Impact products that must be adhered to when performing this suggested integration.
To explain the Netcool plugin I will split it up into two distinct parts, these are inbound and outbound workflow. This blog will cover inbound workflow only, while part two of this blog will cover outbound workflow. The inbound workflow itself was decomposed into two phases, the first phase was raising an incident in ServiceNow and the second phase was returning the Incident Number of the newly created incident and then updating the original event back in the ObjectServer’s alert.status table with the incident number.
By choosing to configure a SOAP insert web service, this meant I had to leverage the existing Impact component of the TBSM server. This was achieved by creating a policy that utilises the web services data source adapter inherent in Impact. The Netcool plugin itself creates a WSDL that can be accessed via a URL, for example https://<yourservice-now-URL>/imp_netcool_alerts_status.do?WSDL. So it was just a matter of downloading and compiling the WSDL provided by the Netcool plugin and then crafting a policy to raise incidents in ServiceNow. So with my policy created it was time to outline how an incident is raised in ServiceNow via my policy.
First of all an event arrives that matches a given criteria, let’s say that the criteria is that all new events with a severity of ‘Critical’ will get raised as a ServiceNow Incident. So an event arrives with a severity equal to ‘Critical’ and count equals to ‘1’ and as this matches the restriction filter in the ObjectServer event reader this will call my InsertIncident policy.
Secondly, the InsertIncident policy takes fields from the event and passes the fields as parameters to generate a SOAP message that inserts the event into the imp_netcool_alerts_status import set table. This import set table acts as a staging area for records created from a data source, which in this case is the originating event in the alerts.status table on the ObjectServer.
Finally , when the data gets inserted into the import set table, the transform map which is defined in the Netcool plugin takes the data from the import set table (imp_netcool_alerts_status) and inserts the data into an existing ServiceNow table in this case the Incident table. When the data is inserted into the Incident table the incident has been successfully raised in ServiceNow. It is the transform map which gives ServiceNow a great deal of flexibility, this can be customised to fit the needs of any prospective customer. The process to insert an incident is outlined in the following diagram: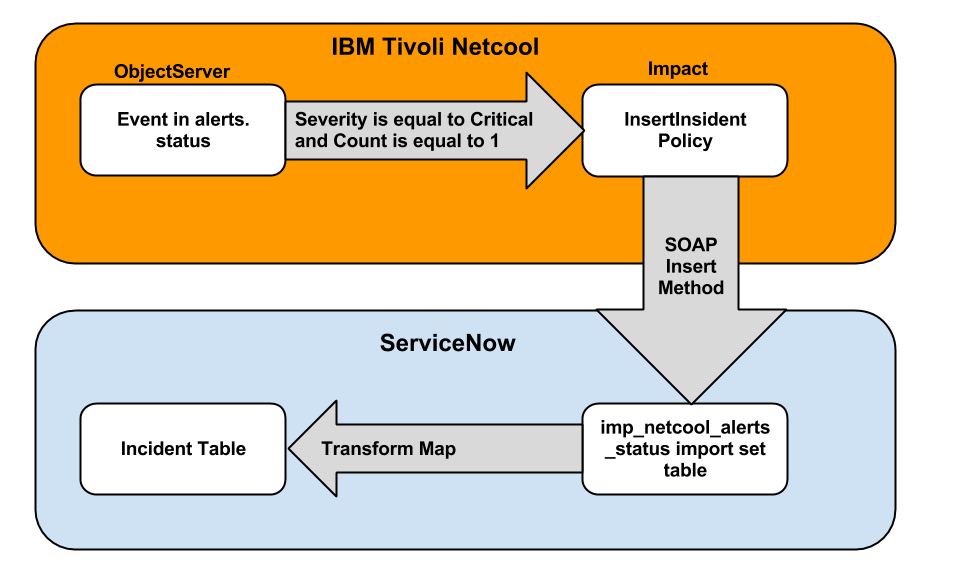
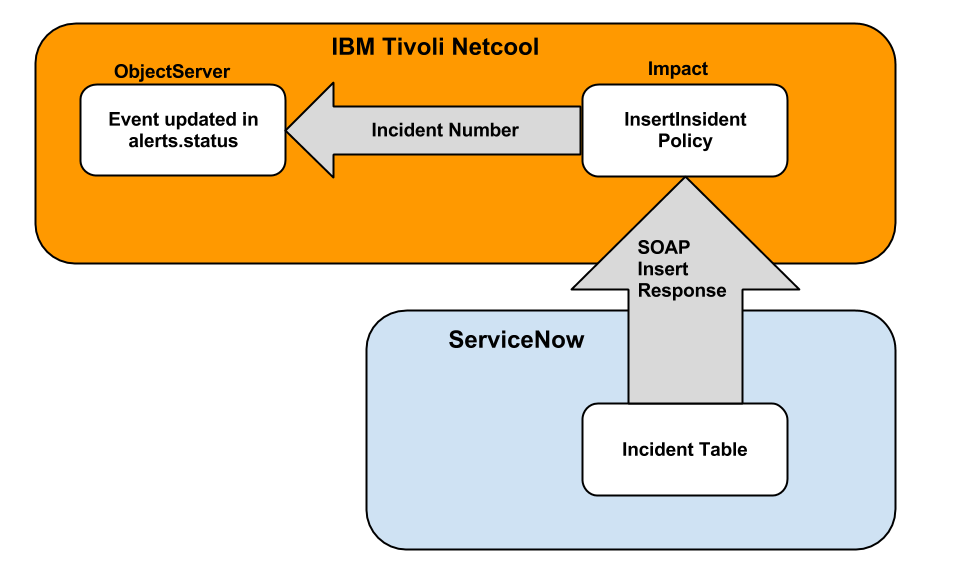
With the first phase of the inbound integration completed, it was time to start the second phase of the inbound integration. The second phase will use the functions provided by Impacts policy language to extract the incident number from the insert response and update the originating event in alerts.status with the incident number.
There was a minor problem with the insert response as it returned only the ‘sys_id’ field, this is the unique identifier for each record in ServiceNow it is identified by a unique 32-character GUID, quite useful in all honesty but what I was after was the Incident Number itself. Below is an example of the InsertResponse from the policylogger log:
10 Apr 2013 14:52:49,655: [InsertIncident][MessageProcessor-Dog#13]Parser log: Web Service call insert return result: <insertResponse xmlns=”http://www.yourservice-now.com/netcool” xmlns:xsd=”http://www.w3.org/2001/XMLSchema” xmlns:SOAP-ENV=”http://schemas.xmlsoap.org/soap/envelope/” xmlns:xsi=”http://www.w3.org/2001/XMLSchema-instance”>
<sys_id>7c3611df7ba4890062cc5e96ff4d4df5</sys_id>
<table>incident</table>
<status>inserted</status>
</insertResponse>
So after a bit of custom configuration on ServiceNow the Incident Number was added to the InsertResponse (red text):
10 Apr 2013 13:09:03,650: [InsertIncident][MessageProcessor-Dog#7]Parser log: Web Service call insert return result: <insertResponse xmlns=”http://www.yourservice-now.com/netcool ” xmlns:xsd=”http://www.w3.org/2001/XMLSchema” xmlns:SOAP-ENV=”http://schemas.xmlsoap.org/soap/envelope/” xmlns:xsi=”http://www.w3.org/2001/XMLSchema-instance”>
<sys_id>287e74937b64890062cc5e96ff4d4dfc</sys_id>
<table>incident</table>
<display_name>number</display_name>
<display_value>IM13-120327</display_value>
<status>inserted</status>
</insertResponse>
With the Incident Number now present in the InsertResponse the Incident Number could now be extracted using the RExtract function and inserted back into the originating event. The process to retrieve an incident number is outlined in the following diagram:
With the second phase of the inbound integration complete the customer now has Impact raising incidents in ServiceNow with the incident Nnmber being inserted back into the originating events. The process of using Impact to create and generate incidents was straightforward thanks to the Netcool plugin.
Part 2 of this blog will focus on outbound events integration from ServiceNow into Netcool. I hope that this blog will prove helpful and if you would like to discuss anything in this blog then give me call on Orb Data on +44 (0) 1628 550450 or email me at neil.richards@orb-data.com .
Visits: 1562